Theme Layout

Boxed or Wide or Framed

Theme Translation

Display Featured Slider

Featured Slider Styles

[Centred][caption2]

Display Grid Slider

Grid Slider Styles

[style5]

Display Trending Posts

No

Display Author Bio

No

Display Instagram Footer

yes

Archive

© 2015 mo'adore | Content and design by Morag Lee | Powered by Blogger.

Showing posts with label baking. Show all posts
Mint Chocolate Vegan Brownies

Mint Chocolate Vegan Brownies


mint chocolate vegan brownies


When it comes to chocolate I'm going to admit what, to some people, might be a bit of a blaspheme: I don't really like to eat a bar of it (crisps are my downfall). All the vegan chocolate I own in my cupboard is specifically regulated for baking and out of all the baked goods it's a brownie I love to bake the most. 

So when new vegan chocolate brand Ethicoco* got in contact asking if I wanted to try some of their bars, I knew what I wanted to do with them.  I combined the Ecuadorian with Oat Milk and the Peruvian Dark Chocolate with a bar of mint chocolate from Plamil Foods I already had in my cupboard to create a mint chocolate vegan brownie. 

The recipe I use as the base for all my brownies is from From Pasta to Pancakes, each time just changing a few things. 

Ingredients:
225g vegan butter (I use Pure Soya Spread)
one bar Ecuadorian Old Milk chocolate
one bar Peruvian Dark Chocolate 
one bar Pamil mint chocolate
egg replacer for four eggs
275g muscovado sugar
200g plain flour
1/2 teaspoon baking powder

Method:
1. Preheat the oven to 180°C/350°F/Gas Mark 4
2. Crease a 30cm/12 inch x 20cm/8 inch baking tin with butter. Line it with greaseproof paper.
3. Melt the chocolate and butter in a saucepan until they make a smooth mixture. Set aside to cool for a few minutes. 
4. Beat the eggs in a bowl and mix in the muscovado sugar. 
5. Add the chocolate mixture and stir well. 
6. Gently add the flour and baking powder, stirring until evenly mixed.
7. Pour the mixture into the lined tin and cook in the hot oven for 25 minutes.
8. Remove from the oven. It should have a wonderful crisp top yet the muscovado sugar will have made it sensationally gooey in the middle.
9. Cut into squares and serve. 

Remember to stop by the Ethicoco website and check out what other chocolate bars are on offer. 

What your favourite brand of vegan chocolate? Have you heard about Ethicoco? 

Read more
mòrag
2 Comments
My Cookbook Collection 2

My Cookbook Collection 2


veggie cookbooks uk

Once upon a time (two years ago, even) I wrote a blog post showing off some of my cookbook collection. It can take a while to get through an entire - or most of a - cookbook so it's only now I'm getting around to showing off some of my newer additions.

The Allotment Cookbook
This was purchased back at the start of 2013 to work in with my goal of growing my own food as it does contain information on what time of year is best to grow certain types of vegetables, with some other advice as well. However this isn't a cookbook I find myself reaching for too much despite the lovely looking recipes mainly because most of the recipes require more ingredients than my other cookbooks and a lot of the vegetables aren't ones I either grow myself or can find in a local Metro (if you can shop in an actual supermarket this may be more up your street). This isn't strictly a vegetarian cookbook so meat eaters may like it too, however because it is based around food you can grow on an allotment meat is used very sporadically anyway.

The Vegetarian Cookery Bible
If you follow me on Instagram you might have noticed a lot of my recent dishes have an open cookbook in the background. This comes from this cookbook which was a present on my 23rd birthday. I find myself reaching a lot for this cookbook a lot - though I do have to veganise a lot of the recipes as cheese is used quite heavily throughout. Whilst I use this cookbook a lot I wouldn't say it's suitable for a vegetarian learning how to cook and it's more for people who already know their way around a kitchen.

The Cupcake
The easiest and simplest baking book I own - most of the recipes don't have more than seven ingredients and are simple to make. However this does mean the final cupcake isn't of an impressive nature and would be more suited for someone who is just getting started with baking rather than for a serious baker who is looking for recipes to really impress someone with. All recipes are vegetarian however because the recipes are simple I find they are very simple to make vegan.

Do you own any of these cookbooks? Any cookbooks you think I should add to my collection (I am looking for new ones)?

Morag x
Read more
mòrag
1 Comments
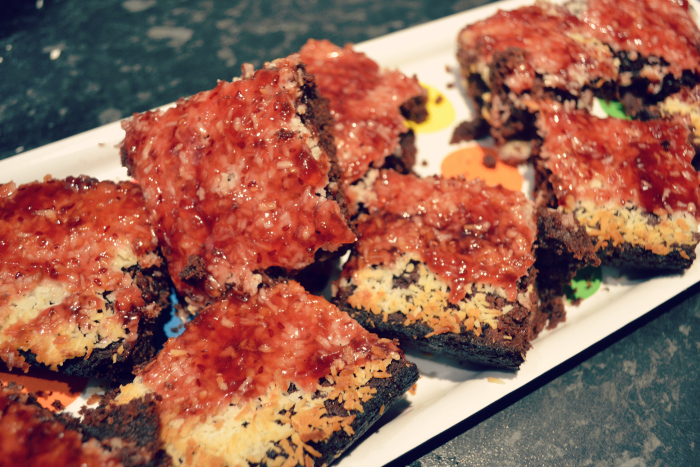
Vegan coconut and raspberry brownies

Vegan coconut and raspberry brownies


vegan raspberry and coconut brownies

rasperry and coconut brownies hartleys

coconut vegan brownies with raspberries

raspeberry and coconut brownies vegan ingredients

I baked these vegan coconut and raspberry brownies a week ago and judging by the amount of likes/hearts/favourites they got on Twitter, Facebook and Instagram and reckon it's high time I shared the recipe. Two weeks ago I just got the urge to bake for no reason (does anyone else get that?) and I knew it had to be a brownie, so I turned to my Brownie board on Pinterest. I was drawn to these Raspberry Coconut magic bars but I didn't have any biscuits for the base so decided to improvise the recipe. 

For the brownie I used to my default recipe which is a veganised version of the recipe from Pasta to Pancake: the Ultimate Student Cookbook. I've gotten pretty good over this past year at veganising various cake recipes so this was actually quite the doddle. And then I added the coconut and raspberry over it. 

Ingredients:
225g butter substitute
275g vegan chocolate (I used some dark, some milk)
4 medium eggs (or 4 teaspoons equivalent egg replacer)
275g brown sugar (originally recipe uses muscovado sugar)
200g plain flour
1/2 teaspoon baking power
Bag of dessicated coconut
100g icing sugar (and some water)
The Groovy Food company agave nectar
raspberry jam

Instructions
1. Preheat the oven to 180C/350F/Gas Mark 4
2. Melt the chocolate and butter in a saucepan until they make a smooth mixture. Set aside to cool for a few minutes
3. Prepare the egg replacer and then mix in the brown sugar
4. Add the chocolate mixture and stir well until combined
5. Gently add the flour (remember to sieve!) and baking powder and ensure it is evenly mixed
6. Line a tin with baking paper and pour the mixture in and spread about evenly with a spatula
7. Cook for roughly 25 minutes (time will depend on oven - just keep an eye on it and if something pointy is stabbed in and comes out clean it's ready)
8. Create a small amount of water icing with the icing sugar and water and add in the coconut (I can't remember my measurements - just go by personal taste)
9. Spread over the now - hopefully - cooled brownies. 
10. Squeeze some agave sugar over the coconut - to taste
11. Baked for about ten minutes (just enough to crisp the coconut a bit)
12. Take out the oven, wait to cool a bit, spread over jam. 
13. Cut up into squares and consume about two days worth of calories in one sitting (or take into your work).

P.S. I don't actually recommend eating these all in one sitting - they are very rich. I did however start eating them in bed and ended up falling asleep with the plate in the pillow beside me. #whoneedsmen

Morag x


Read more
mòrag
0 Comments
So You're a Beginner To Baking?

So You're a Beginner To Baking?


It's probably not a very well kept secret that I'm a bit of a baked goods fanatic. Almost all my Instagram photos are cupcakes or brownies, and those photos tend to be my most commented or liked photos. I was encouraged to cook as a kid, I took Standard Grade Home Economics and also Introduction to Cake Decorating, which does help explain my confidence in a kitchen. However it wasn't until the past year that I began to take baking (and other forms of cookery) extra seriously having founded my university's Cupcake & Baking Society and also becoming vegetarian which meant most ready meals were a no-go area for me and to put an end to the myth that all veggie dishes are boring. 

So, I really haven't been baking for all that long. And not having been that long I can vouch that it easier than it sounds to get into it and that I can remember some of the best baking tips to get started on if you are not all that familiar with the world of cupcakes, brownies and macaroons. 

1. Kit Out Your Kitchen

There are obviously some baking equipment that only belongs in a professional kitchen. Put the blowtorches aside - it'll be a while before you perfect that soufflé! But even for the basic cupcake or truffle their are certain items you will definitely need.

For the easier recipes you will no doubt need:
  • sieve
  • as many bowls as you can store (you might need two going at the same time)
  • muffin tin
  • baking tray
  • cake cases
  • as many wooden/plastic spoons as you can store (I recommend plastic!)
  • measuring scales (get one that does American and British measures)
  • measuring jug
  • measuring spoons
  • measuring cups
  • electric whisk (you can a traditional one if you want - but it'll be harder)
  • cooling rack
There are plenty more types of baking equipment out there. But from my experience to get started on the basic baking recipes, above is what you'll need. Even something such as the simple rolling pin is only required if you're making a dough based recipe (which I don't recommend for beginners). 

2. Find Some Recipes

Being able to tell the difference between a good recipe and a bad one is something that takes some experience. Also I would tell you to be weary of recipes you find on the internet as anyone can put them up; to get a book deal you have to prove that you know a thing or two about a sieve and spatula. Most of the recipes I have managed to mess up have been from the internet. Let that do the talking. Two online resources I do recommend however are BBC Good Food and the other BBC food site. And as for those of you who don't own a printer (or prefer a cute book for display purposes) two books I recommend are The Cupcake and the baking section of Vegetarian Nosh for Students (a book long-term followers will know I've raved about before). 

When it comes to recommendations for what type of delicacies to create I'd recommend that if you're an absolute beginner to go with the oven-free recipes such as truffles or crispy bites (you'll find recipes out there a lot more exciting than just the rice crispy puffs from your childhood). Or if you're comfortable with an oven and a timer then try your hand at brownies, muffins or cupcakes. Brownies are easiest, though if you do burn the outside of a cupcake a good layer of icing shall cover it. Things to avoid for now: bread, macaroons, cake pops, pizza and any kind of pie. 

3. Finding Ingredients

Now that you've had a look at some recipes - and hopefully selected some - you'll have a good idea of what to go looking for when out shopping. Most baking ingredients can be found at most major supermarkets (unfortunetly little Tesco Metro's might not having everything you're looking for). Depending on what recipes you're looking at you'll know what to look for when it comes to flavouring however there are some ingredients that are basic for most recipes, and I recommend having two boxes at a time. 

My basic baking cupboard consists of:
  • Plain flour (N.B. flour should always be high quality - cheap flour is obviously cheap)
  • Self-raising flour
  • Baking Powder
  • Bicarbonate of Soda/Baking Soda
  • Caster Sugar
  • Granulated Sugar
  • Golden Caster Sugar/Muscovado sugar (more appropriate for brownies)
  • Icing sugar (and plenty of it! One batch of cupcakes can use half a box)
  • Cocoa powder
  • A range of spices and herbs (make sure you have cinnamon)
  • Flavourings (make sure you have vanilla essence)  
  • Every liquid food colouring available from the supermarket
  • My decorating drawer
  • Egg replacer (as I'm currently experimenting with vegan baking)
And within the fridge you'll find my milk, butter (both soya), eggs, single and double cream. What you'll need could differ but this should cover many different basic recipes. 

4. Get On With It!

Now that you've kitted out your kitchen, chosen some recipes and bought your ingredients it's time to get on with the baking part. 

Here are some general guidelines
  • Measure exactly - even experienced bakers cannot afford to guestimate
  • Sieve your flour, coca powder and other other powders even if the recipe doesn't say so
  • Crack open and beat the eggs in a separate bowl - unless you want eggshells in your cakes?
  • Feel free to trade dark chocolate for milk chocolate (or visa versa) for your personal taste buds
  • Aside from that follow the recipe word for word - it is a chemical reaction
  • Always use a timer for the oven part
  • Clean up everything whilst they're in the oven
  • Keep the oven door shut aside from halfway through for turning them - unless you wish to wait longer?
  • Only begin to prepare the icing once the cakes are cool, otherwise it might set whilst you wait
  • Push a skewer or cocktail stick through the cake to work out if it's cooked (i.e. it comes out clean)
  • For more experimental baking at home I use re-usable silicon cases and keep the paper ones for cakes I share with others

5. Practise and Develop

As with most life skills the secret is to practice, practice, practice. Once you feel accomplished with the basic cake or muffin recipe you can start experimenting with different flavours or perfecting the decorating process (which is what I'm currently trying to master) or moving onto another types of recipe such as large cakes or meringues. 

One of the reasons I take so many pictures is so I can document my progress. If you look through my Instagram  you'll see a big change in my cakes and how adventurous I've been. From some messy looking cakes towards some perfectly formed brownies and the 99 cone cupcakes I made last week I've definitely made progress. Plus I actively keep track of what recipes I've made and which I'm yet to try and I'm always having a nosey on Pinterest for some extra ideas. 


Happy baking beginner bakers! 


Morag
Read more
mòrag
12 Comments

RSS • Google Friend Connect • Bloglovin • Feedly

Follow moadore on Snapchat!

Recipes, love letters and general chit chat can be sent to moadore@gmail.com.

Follow @moadore